Distributed Training of Deep Learning model with Slurm on GCP
Faster Training of Large Deep Learning models is much easier than you think with the help of Slurm.
Recently, I was working on Big Machine Learning project. The task was to pretraining Large Machine learning models (with parameter in the range of several Billion ). And Normal training approch didn't work ( obviously ).With 8 GPU Volta core machines, it would take several months to complete just 1 epcoh of training, that's the point when i think of distributed training. I was using gcp ( google cloud ) for training models and found out that google already have support for High Performance Computing with Slurm . You can find Minimal working example on slurm from google codelabs here https://cloud.google.com/solutions/deploying-slurm-cluster-compute-engine.
Through this blog, I will try to explain what is HPC? , Why HPC ?, how can we train large Deep Learning models with slurm.
What is HPC ?
High Performance Computing (HPC) is the use of supercomputers and parallel processing techniques for solving complex mathematical and computational problems. HPC technology primarily focuses on developing parallel processing algorithms and systems by incorporating both administration and parallel computational techniques. HPC is typically used for solving advanced problems that require a lot time .
Why HPC ?
When you have loads of data and its processing takes really long time, then the approch divide et impera comes at hand.
With HPC, we can divide any job so that every node processes different partitions of the data in parallel, speeding up the execution time.
Slurm Workload Manager on GCP
To make computing with slurm easier in GCP, Google and SchedMD ( Slurm's Creators ) joined forces and as a result, we can run a Slurm cluster on Google Cloud Platform. We don't have to worry about the parallel computing techniques since slurm takes care of that and GCP takes care of setting up a cluster and providing resources. Basic architectural diagram of a stand-alone Slurm Cluster in Google Cloud Platform.
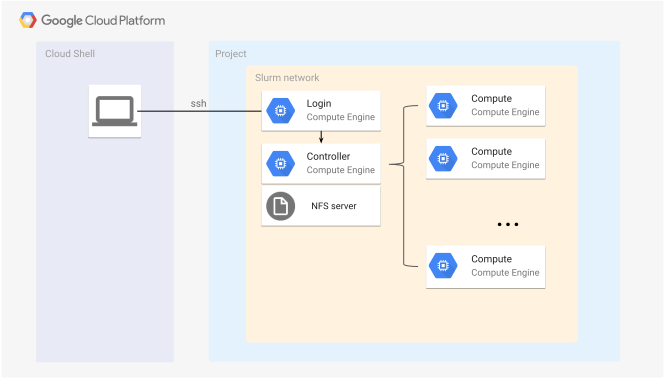
As we can see in above pictures, Slurm cluster contains three types of nodes: login, controller and Compute node.
- Login Node serves as an interface for the user: user should communicate with the cluster exclusively through the login node (starting the job, requiring resources, ...)
- Controller Node manages resources and job scheduling for the user.
- Compute Node executes the job.
Setting Up a Slurm Cluster on GCP
Before describing the setup, let us explain in short how does GCP implement a slurm cluster.
In GCP, a cluster is realized as a deployment. A deployment is an instantiation of a set of resources that are defined in a configuration. A deployment can contain a number of resources, across a variety of Google Cloud Platform services. When you create a deployment, Deployment Manager creates all of the described resources in the respective Google Cloud Platform APIs.
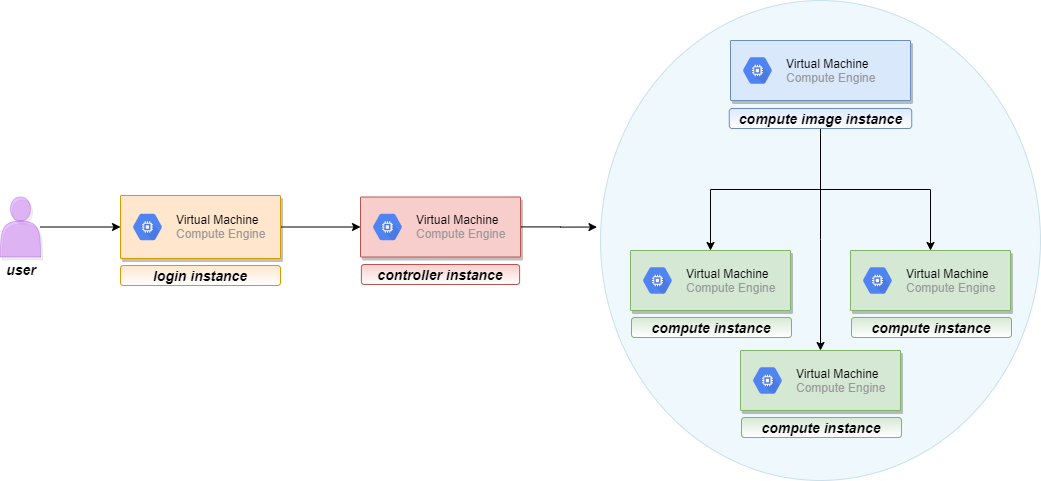
This brings us to the cluster's nodes. Each node in a cluster is actually a Virtual Machine.When a deployment is created, three new virtual machines appear in "VM instances" page, under "Compute Engine". Those VMs are login instances, Controller instances, and compute image instance.
Compute Instance is a bit trickey part. One thing to notice is that deployment does not create compute instance,but exactly one compute image instance even if you request more compute nodes in your cluster. So, if a user requests 10 compute nodes for the cluster, those 10 virtual machines will not be immediately instantiated with the cluster deployment. Here's what is happening. These compute instances are created in the later step when you run a job and request the number of nodes for the job. Then the compute nodes will be allocated, and they will appear in the "VM Instances" page. Shortly after the job is completed, these virtual machines will be deallocated and will disappear from the list. This way a user gets new compute VMs everytime. The fact that deployment create compute image instance rather than compute nodes directly is that, you might not be using compute node all the time and creating compute nodes unnecessarily might affect your billing, so , slurm will create new compute nodes and use compute image instance as a templete to dynamically create new instance during running jobs, so that you will be billed for exact time period your compute node will run.
Below you can see visual representation of the described process:
Finally, let's head to the cluster setup. In this blog post, we will setup Slurm cluster for training Deep Learning Model with several nodes.Customize the information so that they will suit your needs:
- Launch Google Cloud Shell
- Check that you already authenticated and that the project is already set to your PROJECT_ID:
$ gcloud auth list

Credentialed accounts:
<your email>

$ gcloud config list project
[core]
project = <PROJECT_ID>
- Clone git repository that contains the Slurm Google Cloud Platform deployment-manager files:
$ git clone https://github.com/SchedMD/slurm-gcp.git
- Switch to the Slurm deployment configuration directory:
$ cd slurm-gcp
- Configure the Slurm Deployment YAML file. Provide information that suits your needs. There are plenty more parameters available, they can be found in SchedMD's GitHub repository. Below is the script that was sufficient for my needs.
# [START cluster_yaml]
imports:
- path: slurm.jinja

resources:
- name: slurm-cluster
type: slurm.jinja
properties:
    cluster_name            : slurm-job

    zone                    : us-central1-b
    controller_machine_type : n1-standard-2
    controller_disk_type      : pd-standard
    controller_disk_size_gb   : 50
    external_controller_ip    : True

    login_machine_type        : n1-standard-2
    login_disk_type           : pd-standard
    login_disk_size_gb        : 50
    external_login_ips        : True

    compute_image_machine_type  : n1-standard-2
    compute_image_disk_type   : pd-standard
    compute_image_disk_size_gb: 200
    external_compute_ips      : False

    partitions :
    - name           : gpu
        machine_type   : n1-standard-16
        max_node_count : 10
        zone           : us-central1-b
        # cpu_platform           : Intel Skylake
        preemptible_bursting   : True
        compute_disk_type      : pd-standard
        compute_disk_size_gb   : 200
        gpu_type               : nvidia-tesla-v100
        gpu_count              : 1

#  [END cluster_yaml]
- In the Cloud shell Session, execute the following command from the slurm-gcp folder:
> gcloud deployment-manager deployments create slurm-deployment --config slurm-cluster.yaml
This command creates a deployment named slurm-deployment. The operation can take few minutes to complete.
5. Verify the deployment ( Navigation menu --> Deployment Manager) 6. Verify the cluster's instances ( Navigation menu --> Compute Engine --> VM Instances) There should be login , controller, and compute image instances. Compute image instance will live for small amount of time for setting up compute images, after that it will be off. and Compute Instances show up only when you allocate them for the sbatch job. they disappear shortly the job is completed. 7. Log in to login instance .
While logging in to the login instances if Slurm is currently being installed/configured in the background. Don't install any packages during that time, as that might disrupt the installation process of slurm. Wait for around 10 for slurm to be installed fully and you can log in to login instances and do whatever you want.
Setting up Deep Learning Environment inside slurm cluster
- SSH to login instance in your slurm cluster.
- After sucessfully installing slurm on cluster, ( /home , /apps ) directory of login instances will be shared with all other instances like controller and compute instances. So that all deep learning and python binaries must be installed inside
/homeor/appsdirectory. - Installing python inside /home:
cd ~

sudo yum -y update; sudo yum groupinstall "Development Tools"

sudo yum -y install openssl-devel bzip2-devel libffi-devel

mkdir tmp;cd tmp; wget https://www.python.org/ftp/python/3.8.3/Python-3.8.3.tgz

tar zxvf Python-3.8.3.tgz; cd Python-3.8.3

./configure --enable-optimizations --prefix=$HOME/opt/python-3.8

make

make altinstall

vi ~/.bashrc
(add line: export PATH=$HOME/opt/python-3.8/bin:$PATH) at the end of .bashrc

source ~/.bashrc
> which python3.8
(output should be: /home/<username>/opt/python-3.8/bin/python3)

# Now Lets install pytorch

> curl https://bootstrap.pypa.io/get-pip.py -o get-pip.py

>  python3.8 get-pip.py

> python3.8 -m pip install torch==1.5.0
- Installing CUDA toolkits and Nvidia-drivers
- Download the latest Nvidia CUDA repository package cuda-repo-rhel7-*.rpm.
> cd ~
> wget https://developer.download.nvidia.com/compute/cuda/repos/rhel7/x86_64/cuda-repo-rhel7-10.2.89-1.x86_64.rpm
- Install the CUDA repository package. This will enable CUDA repository on your CentOS 7 Linux system:
> sudo rpm -i cuda-repo-*.rpm
- Install cuda package from nvidia repository. Pytorch 1.5 works with cuda 10.2, so lets install cuda 10.2. Below command will install cuda and nvidia-drivers inside
/usr/local/cuda-10.2directory.
> sudo yum install cuda-10-2
- By Now we know that only
/homeand/appsdirectory were shared across all other instances. So lets copy cuda directory from/usr/local/to~/opt/cuda
> mkdir ~/opt/cuda
> cp -r /usr/local/cuda-10.2/* ~/opt/cuda/
- Export cuda path to Nvidia CUDA binary executables. Open the ~/.bashrc using your preferred text editor and add the following two lines
export PATH=$HOME/opt/cuda/bin:$PATH
export LD_LIBRARY_PATH=$HOME/opt/cuda/lib64:$LD_LIBRARY_PATH
- Now Re-login or execute your updated ~/.bashrc file:
> source ~/.bashrc
- Now Confirm the CUDA installation:
> nvcc --version
> nvidia-smi #( doesn't work as we dont have gpu in login instances )
By Now your slurm system is ready and can run any training script using
sbatchscheduling. Below I will discuss on how to compile nvidia-apex library. It takes me 2 days just to make nvidia-apex work on slurm cluster.If you follow my above steps exaclty, I am sure you will be able to install nvidia apex library inside your slurm cluster without any problems.
Installing Nvidia-Apex library inside your slurm cluster ( Optional )
If you don't know about Apex library, you can visit Nvidia-Apex github page to know more about Apex library. It is a set of utilites to help training model in mixed precision mode. It provide more numerical stable layer norm operations during training model in mixed precision mode, So that you can have both faster and stable training.
For Nvidia-apex to sucessfully compile, You need to upgrade your gcc --version to 7.3.0 .
> sudo yum install centos-release-scl
> sudo yum install devtoolset-7-gcc*
> scl enable devtoolset-7 bash
> which gcc
> gcc --version
(above bash script must output gcc version as 7.3.0)
Now We will compile and install Apex-library inside python3.8
> git clone https://github.com/NVIDIA/apex
> cd apex
> export TORCH_CUDA_ARCH_LIST="6.0;7.0"
> CUDA_HOME=$HOME/opt/cuda python3.8 -m pip install -v --no-cache-dir --global-option="--cpp_ext" --global-option="--cuda_ext" ./
Its takes around 4 - 6 minutes to compile and install apex.
Distributed Training with pytorch and slurm
I will not give details on how to setup codebase in pytorch for distributed training, Its a huge topic and might need another blog post for it only. Meanwhile, You can learn more about distributed training with pytorch here. After you done setting up distributed training codebase in pytorch. You can start training using sbatch scripts.
Running the training Job Using SBATCH Script
After we have done the cluster setup, preparing deep learning envs and building of the model, the last step is to finally run a job, i.e. to start the training. That is easily done by running sbatch script, which is basically a customized shell script. It effectively has two parts. The first part of the script is specific for the Slurm, it specifies the parameters for the Slurm job scheduler using the SBATCH command. The second part consists of bash (or some other shell) commands that you would normally run in terminal.
Below you will see demo SBATCH script (You need to modify sbatch script according to your needs).
inside run_training.sh file.
#!/bin/sh
 #SBATCH --job-name=distributed_training
  #SBATCH --output=slurm_logs/slrm_stdout.%j
  #SBATCH --error=slurm_logs/slrm_stderr.%j
  #SBATCH --partition=gpu
  ## make sure we don't clobber log files if jobs get restarted
  #SBATCH --open-mode=append
  #SBATCH --nodes=2
  #SBATCH --time=24:00:00
  ## make sure we are told about preempts, and jobs running out of time, 60s beforehand
  #SBATCH --signal=USR1@60
  #SBATCH --cpus-per-task=5
  ## srun forks ntasks_per_node times on each node
  #SBATCH --ntasks-per-node=1
  #SBATCH --mem=200G
  #SBATCH --gpus-per-node=1

python3.8 train.py <Your training args here>
Execute the sbatch script using the sbatch command line:
> sbatch run_training.sh
Running sbatch will return a Job ID for the scheduled job, for example:
Submitted batch job 37
To keep track of the job’s state, run squeue and to keep track of the cluster’s state, run sinfo:
> squeue

JOBID PARTITION NAME USER ST TIME NODES NODELIST(REASON)
3 gpu hostname <username> CF 0:11 4 slurm-job-compute-0-[0-1]

> sinfo

PARTITION AVAIL TIMELIMIT NODES STATE NODELIST
gpu* up infinite 4 mix# slurm-job-compute-0-[0-1]
gpu* up infinite 6 idle~ slurm-job-compute-0-[2-7]
Summary
In this blog post we learned how to setup slurm cluster in GCP ( which is super easy ), setup own deeplearning environment from installing python, pytorch to compiling apex from source and finally run training using sbatch script and keeping track of job state using sinfo, squeue and scontrol.